Face:
I always say to my customers your foundation is nothing without the preperation of your skin. Without the best skin care you'll never get the flawless finish with foundation. To prepare my skin I always start with my forever light corrector lotion, I find it wakes up my skin to prepare for my foundation. After the lotion I always activate my skin using the forever light corrector serum. This is to reduce all the redness on my skin. By doing these two steps every day it has helped reduce a lot of redness on my skin down, therefore I don't have to wear as much concealer/foundation than I used to. The next step is to moisturise using the moisture glow, I couldn't love this product anymore than I already do! It's incredible for preparing and hydrating your skin. Not only does it moisturise to get your skin feeling hydrated and awake, it also adds an amazing glow to your skin to give that radiant finish. The last product out of the skin care is the Blur Perfector primer - now this is the BEST product to get your skin looking flawless. If you didn't have the time to do all the skincare I have mentioned before you go out, I highly recommed that you still use your primer. The difference it creates is unbelievable.


These two pictures compare the Touche Eclat with & without the primer. The first picture on the left side hand is the Touche Eclat on it's own. Obviously it still has it's amazing radiance and coverage. The bottom picture shows the Touche Eclat with the primer underneath, you can see that the primer has made it come to life, getting even more radiance and coverage. You'll notice aswell using the primer will help keep your products on your skin longer.
After all these steps you'd think your skin would feel thick and full of products. Well, thats the beauty of YSL's products - they all have a light weight feel on your skin.
Now onto foundation, I used the Fusion Ink in this look, it has a matte finish which I personally love- no added powder needed! You only need a little bit of this foundation and it goes a long way!
Lastly, for contouring I used the Les Saharinnes cream bronzer in the shade Ambre. This is such an easy product to use for contouring, simply use the sponge side of the applicator to map out where on your face you want to shade, then blend in using the brush side. To complete the face it has got to be the Touche Eclat. I couldn't imagine doing my make-up with out this product. I placed it under my eyes, tops of cheeks to highlight and under my brow bone.
Eyes:

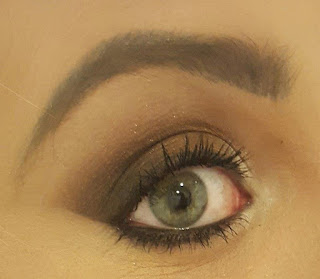
The palette used for these looks is the palette Fetiche, I know this is an old collection palette but I absolutely love it for a night out look. I only used 3 of the shades so it's really easy to recreate. For the lid I used the bronze colour and blended that up towards my brow bone - this colour really compliments green and blue eyes. To make it smokey, I used the middle shade, I didn't want to use the black as I wasn't going for an extremely smokey look. I only blended this colour on the outer corner of my lid. To finish off the eyeshadow I highlighted my inner corner using the light gold - this colour is perfect for any inner corner highlight. To make my lash line a little bit darker I used YSL gel liner (unfortunately discontinuted) and followed that down to my lower lash line. Finally, for the mascara, I used the false lash effect (my personal favourite) this mascara is everything you want in a mascara - it adds the best amount of volume and length without clogging up your lashes.


